
Flawless wedding floorplans & seating charts
Designing the perfect floor and seat chart
Key Takeaways
Create floorplans and seating charts that are to scale and perfectly synced with your guest list.
Drag and drop tables, dance floors, bars, and set the scale of your floorplan
Assign guests to seats with an easy drag-and-drop
Export a clean PDF for caterers and suppliers to showcase seating arrangements, meal and dietary preferences
Create floorplan templates

Check out this quick 2-minute video guide on how to create a floorplan! 🚀📐
Download an Example Floorplan Export here.
Create Floorplan Templates
Save time by creating reusable floorplan templates for your most common event setups.
In the Template section, click on "+ Add Floorplan Template."
The ins and outs of creating floor & seating plans 🚀
Our floorplan tool provides you with a convenient way to design, allocate, and share floor and seating plans for your events.
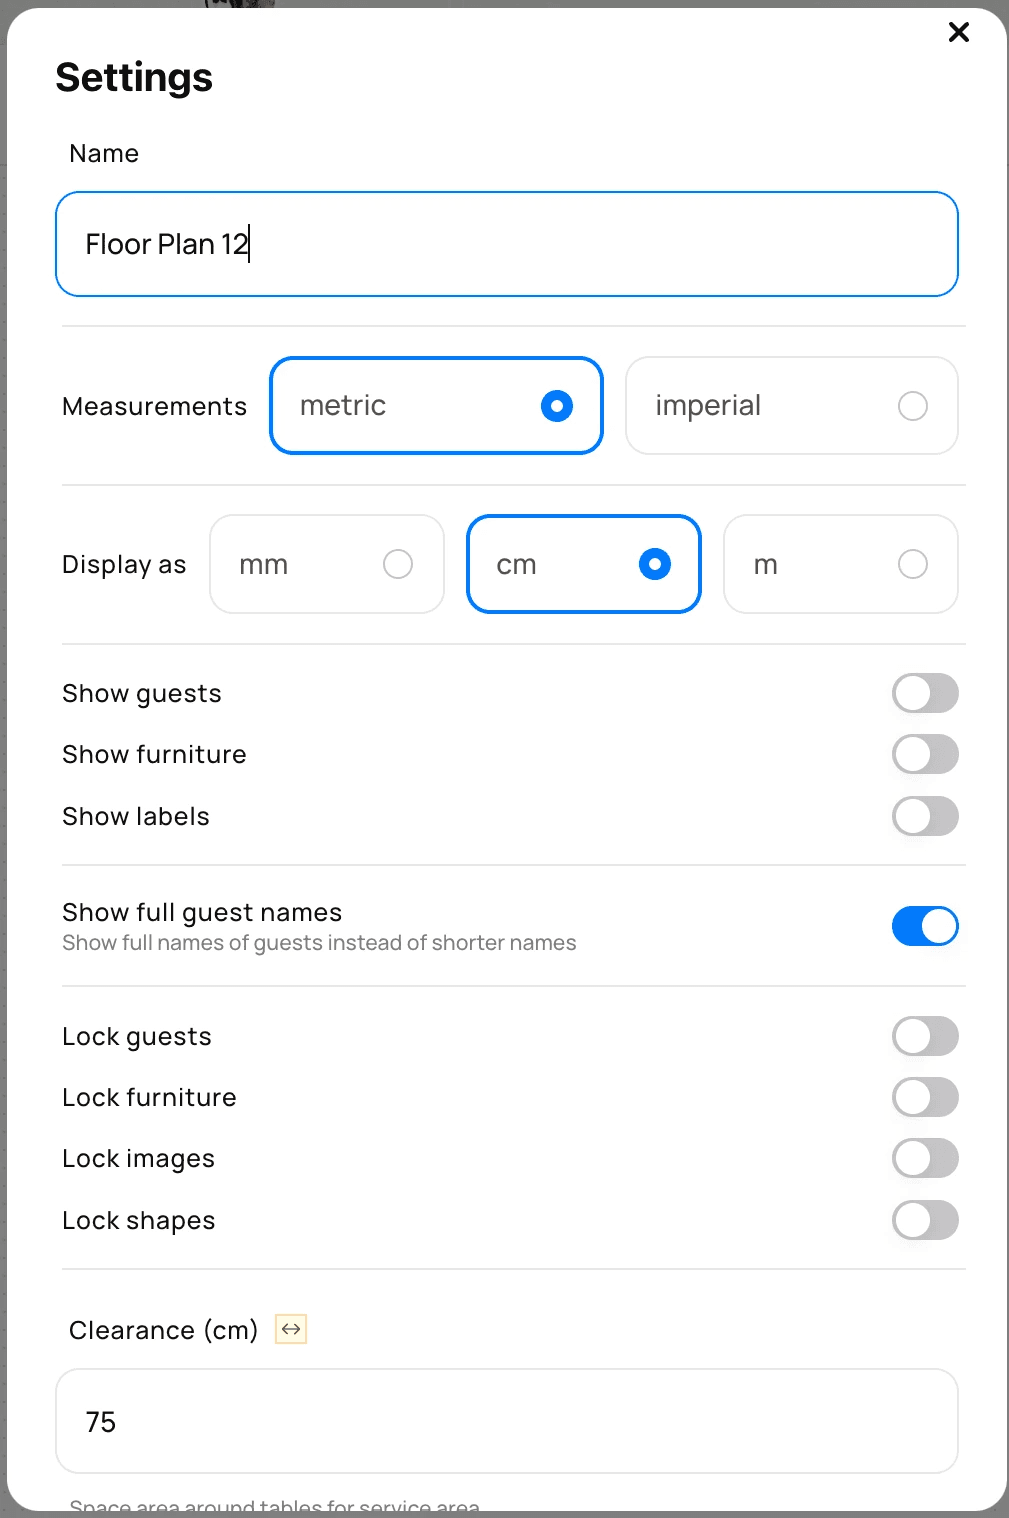
When you create a floorplan, set the name and your preference for unit measurements and clearance guides (we'll highlight this as the minimum distance to keep clear between items). Don't worry about saving: every change is automatically saved and you can collaborate with everyone invited to the platform.
Create as many floorplans as you need and each stays synced with the latest information from your guestlist. Existing floorplans can be duplicated (useful for creating a contingency) and archived when they are no-longer needed.
Layout, canvas and layers

This structure follows many of the layout and components used in other design software, so it may already feel familiar. In the centre is the canvas, where you create and explore your design. Navigating the canvas is similar to using a map: click and drag to move around and use scroll to control the zoom level.
Above the canvas is a toolbar with design tools, navigation controls, import, export, and preferences. In the right panel there is an inspector (used to inspect, adjust, and control items in your design) and the layers panel.
The inspector has three modes:
Design: For creating and editing your floorplan
Furniture: To browse and add furniture items to your design
Guests: Where you, or your couple can manage guest assignment to seats
The layers panel controls the what is shown and hidden in your design. Hidden layers are not shown in the canvas and are not included when you export your design. This is useful for generating different types of exports, such as one for furniture installation (with only the tables) and another for catering (that also includes meal selection).
Upload an image of an existing drawing:
Click “upload” from the toolbar and select your image
Crop off any whitespace and press save
Move and rotate your image on the canvas
From the inspector select “Lock your image” to prevent it from moving
IMPORTANT • Setting the scale of an uploaded image:
It’s essential that your uploaded image is set to the correct scale so furniture is displayed proportionately and the clearance/measure tools perform correctly.
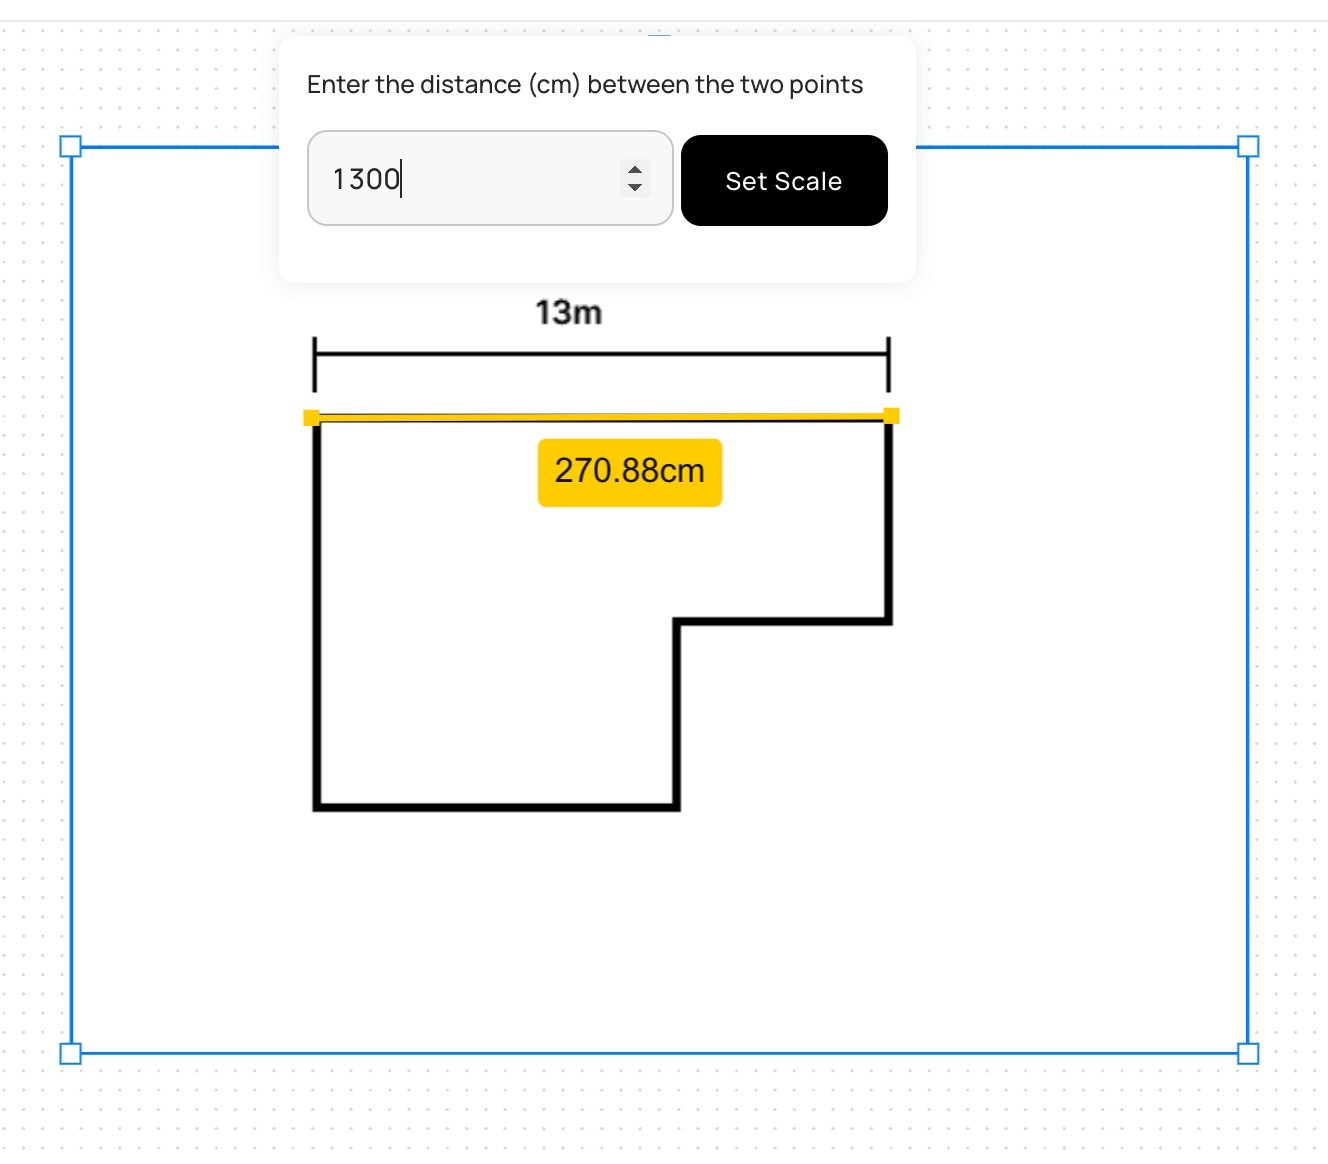
Choose a reference line within the image you know the distance of (e.g. a wall with a dimension labelled)
Move the canvas so this reference line is clearly visible
With the image selected, from the inspector press the “set scale” button to open the scale tool
Click on the start and then the end of your reference line to place the yellow ruler
At the top of the canvas, enter the correct dimension taking care to use the same unit of measurement (e.g. cm/m)
Confirm and your image will be resized automatically to match the correct scale
Adding furniture
In the inspector, change to the furniture tab where you’ll find a library of tables and chairs that can be added to your design. Each one is fully customisable with common configurations as templates to start from. Choose the item you wish to add to your design and move it on the canvas to where it should be positioned. With the item selected, the inspector allows you to control almost all of the properties including the name, seat count, rotation, and dimensions (including the seat size).
Moving groups of furniture at once
Hold down the shift key on your keyboard and select the tables with your mouse
This action will allow you to move the selected group together.
Adjusting the number of seats
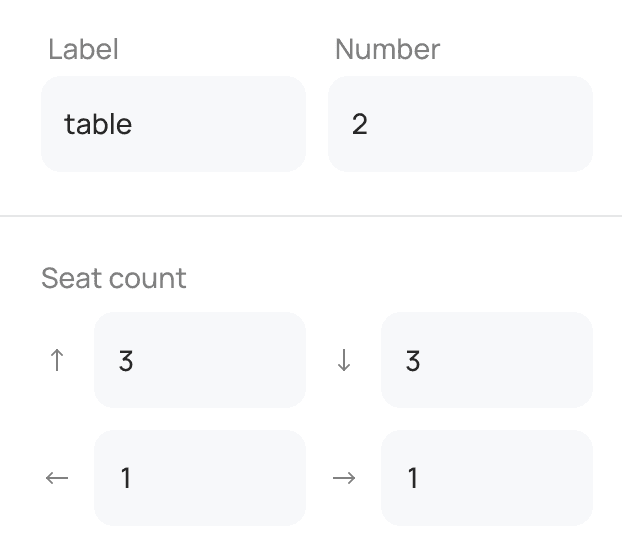
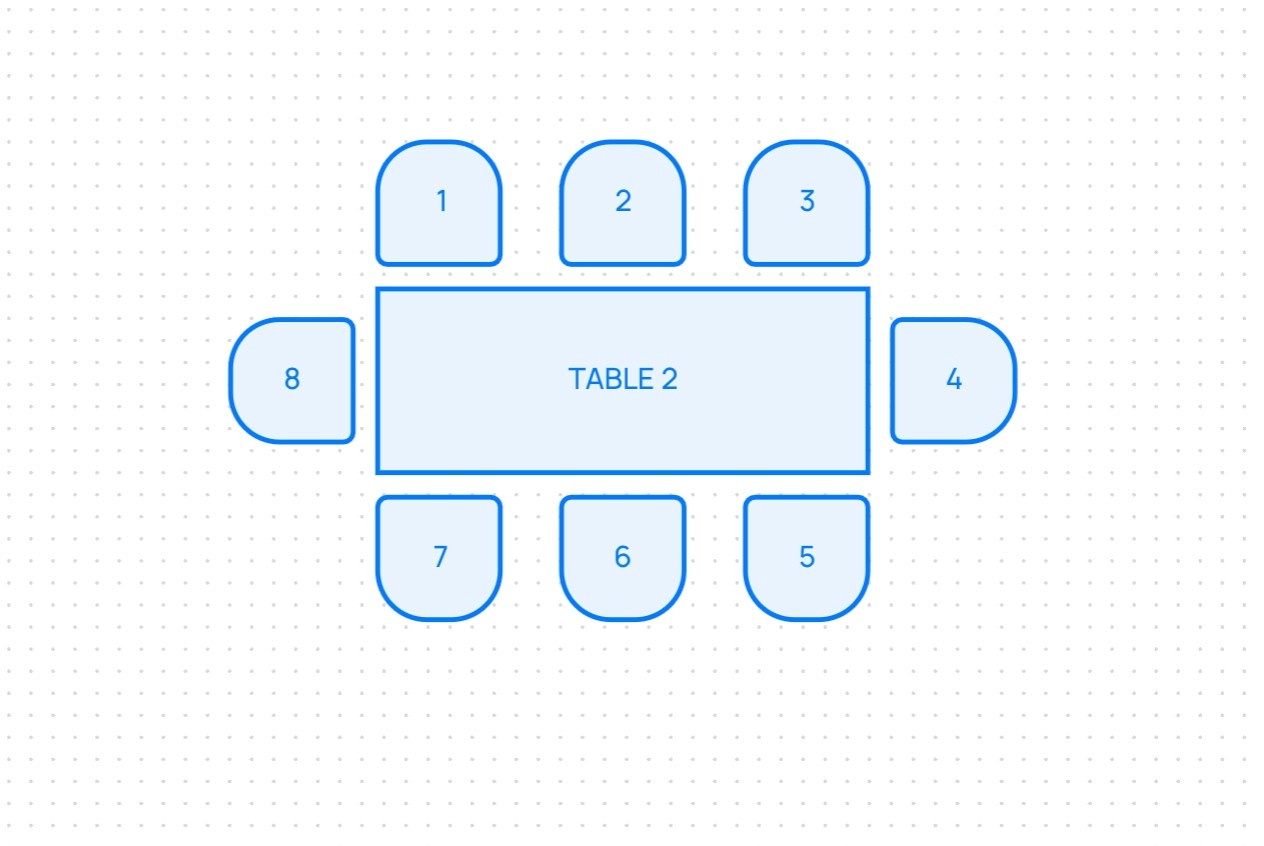
For rectangular or square tables, you can adjust the number of chairs positioned on each side of the table (e.g. for banquette style seating the end of each table can be set to 0 seats). For circular tables seats are distributed evenly around them, you can adjust the table dimension and the number of seats from the inspector. Chairs may also be placed individually from the furniture library and every chair can be modified to a different size or rotation.
When placed into the canvas, both tables and chairs are numbered incrementally. You can change the number at anytime from the inspector, take care to not introduce duplicate table or chair numbers.
Want to add a bar, dance floor, or other furniture?
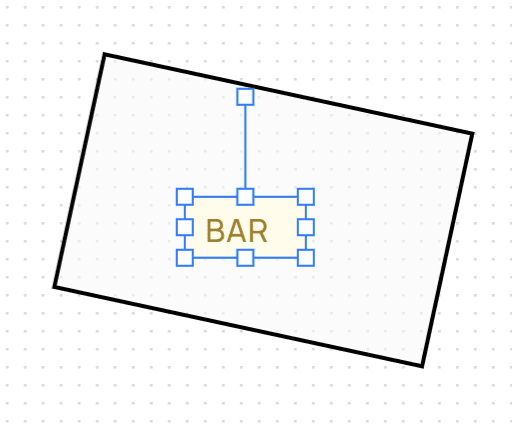
The shape and label tools can be used to add additional information and context to your design such as custom areas or to annotate important features of the room. Select the shape tool and draw the area you wish to add. The Label tool can be used by itself or in combination with the shape tool to add text anywhere on the canvas.
Example furniture options include:
Tables (including chairs)
Ceremony chairs
Chairs only
Furniture: Armchair, loveseat, sofa
Audio Visual: Speaker, monitor
Electrical: Generator, outlet single & double, power drop
Venue elements: Doors (left & right), Restroom (male, female, unisex, accessible)
Plants: Circular and rectangular
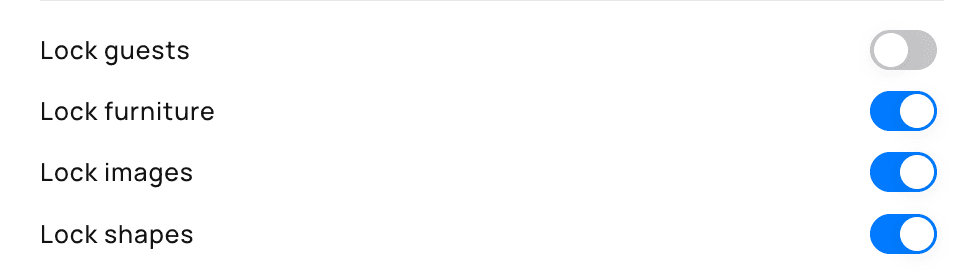
Lock tables & images in place, before asking your client to add their guests
This ensures they don't move things out of place! Navigate to settings and use the toggle to select the items you would like to lock. Click save.
Assigning guests to seats
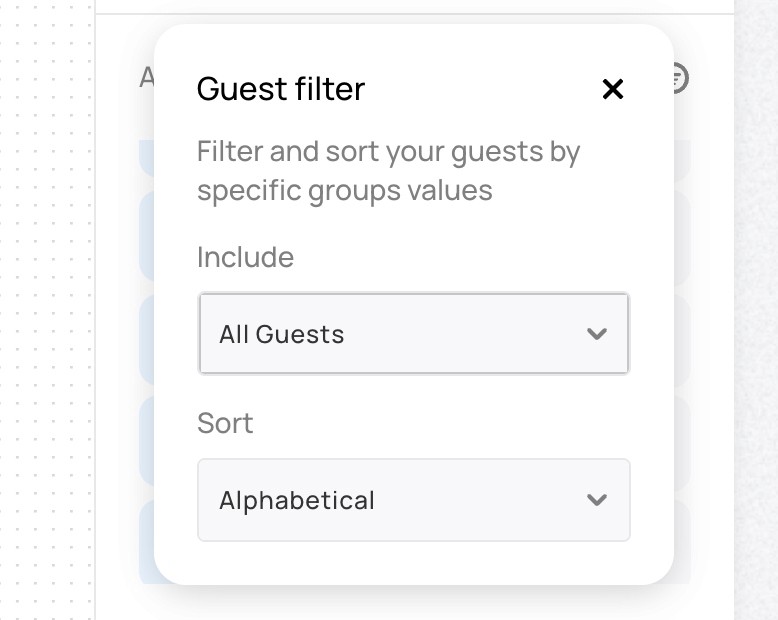
Select the guest tab in the inspector to see a full list of seats and their assignment. There is an overview at the top to check whether you have enough seats for your expected guests and how many guests are assigned a seat so far. You can specify which guests are expected at this event using the filter next to “Allocate seats” which uses tags to filter guests shown in selection list.
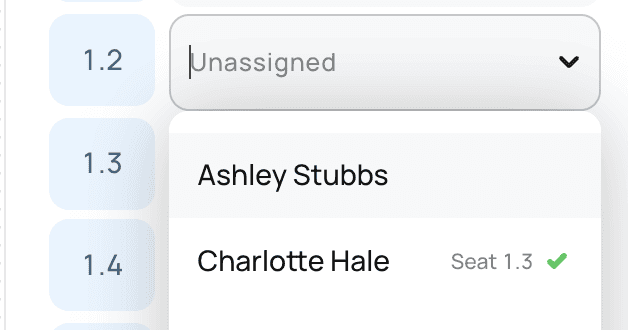
To assign a guest select or search for their name from the dropdown next to each seat. Selecting a guest who already has a seat will re-allocate them. You can also drag and drop the names between seats on the canvas. The guest data shown in your floorplan is synced with your guestlist, enabling powerful workflows where guest information such as allergies to be included in the export. If a guest is removed from your guestlist, they will also be removed from any floorplans.
Edit with collaborators

See who is online and editing the floorplan at any time. This makes it easy to design and refine your floorplan together, no matter where your team is.
See who is currently online and editing
Collaborate on layouts in real time
Make updates without needing to refresh or resend files
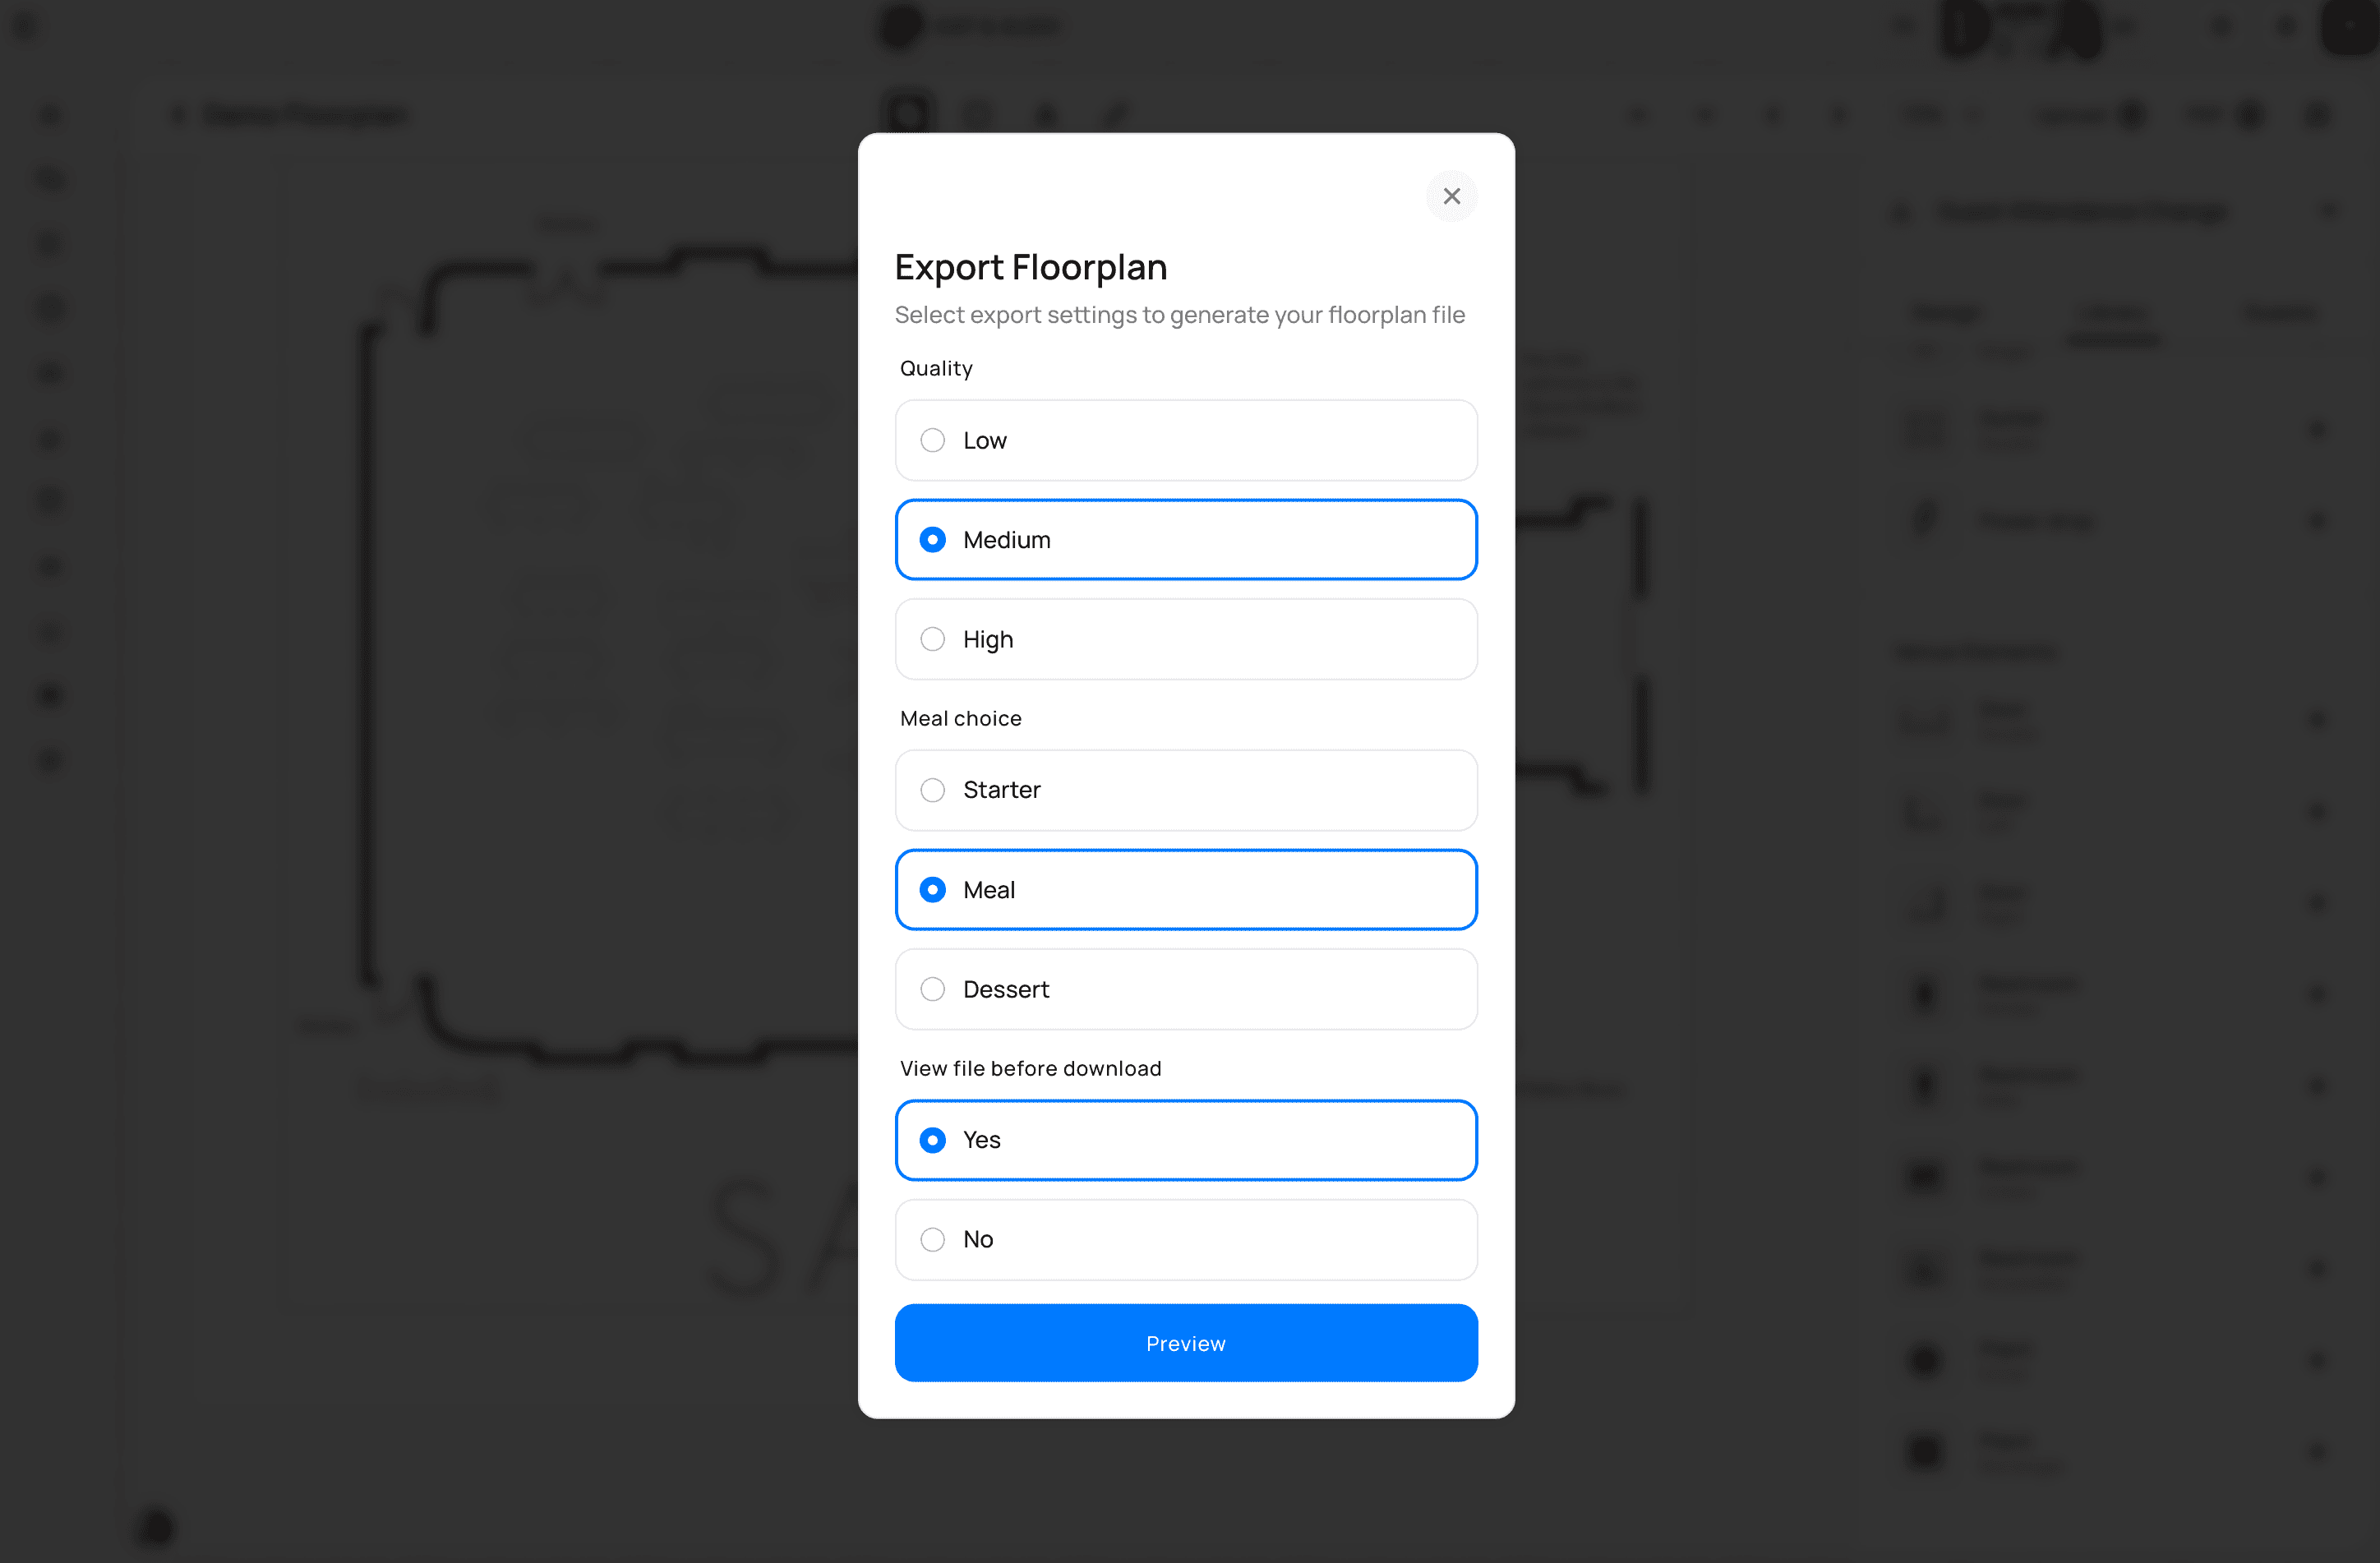
Export and share
Download your design as a PDF in one click: press “PDF” in the toolbar to export your design. You will be able to select the quality, meal choice to sync with and whether you would like to see a preview before downloading. Allergy and dietary information is automatically synced and will be shown in all exports.
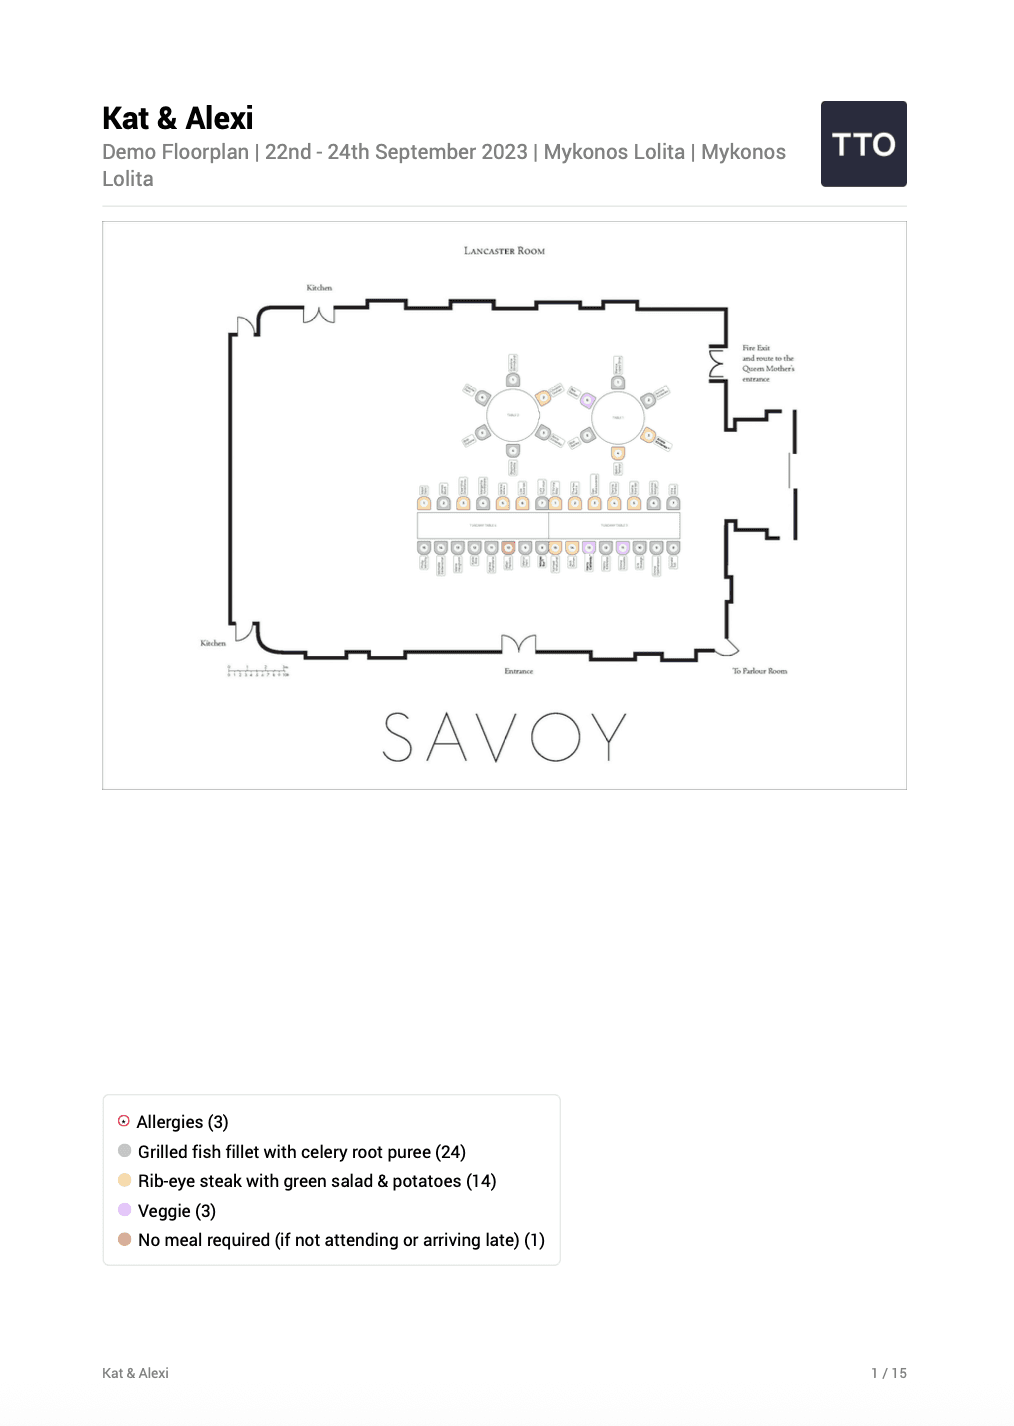
This is an example export of a mean meal PDF:
The first page is a summary of your entire floorplan, with seats color coded according to main meal selections:
This is followed by a summary page of total # of people, # of tables seats, # of meals and a highlight of anyone that mentioned they have an allergy or dietary restriction (alongside where they are sitting)!

An overview of all guests in alphabetical order (useful for name cards, helping guests find their seats):

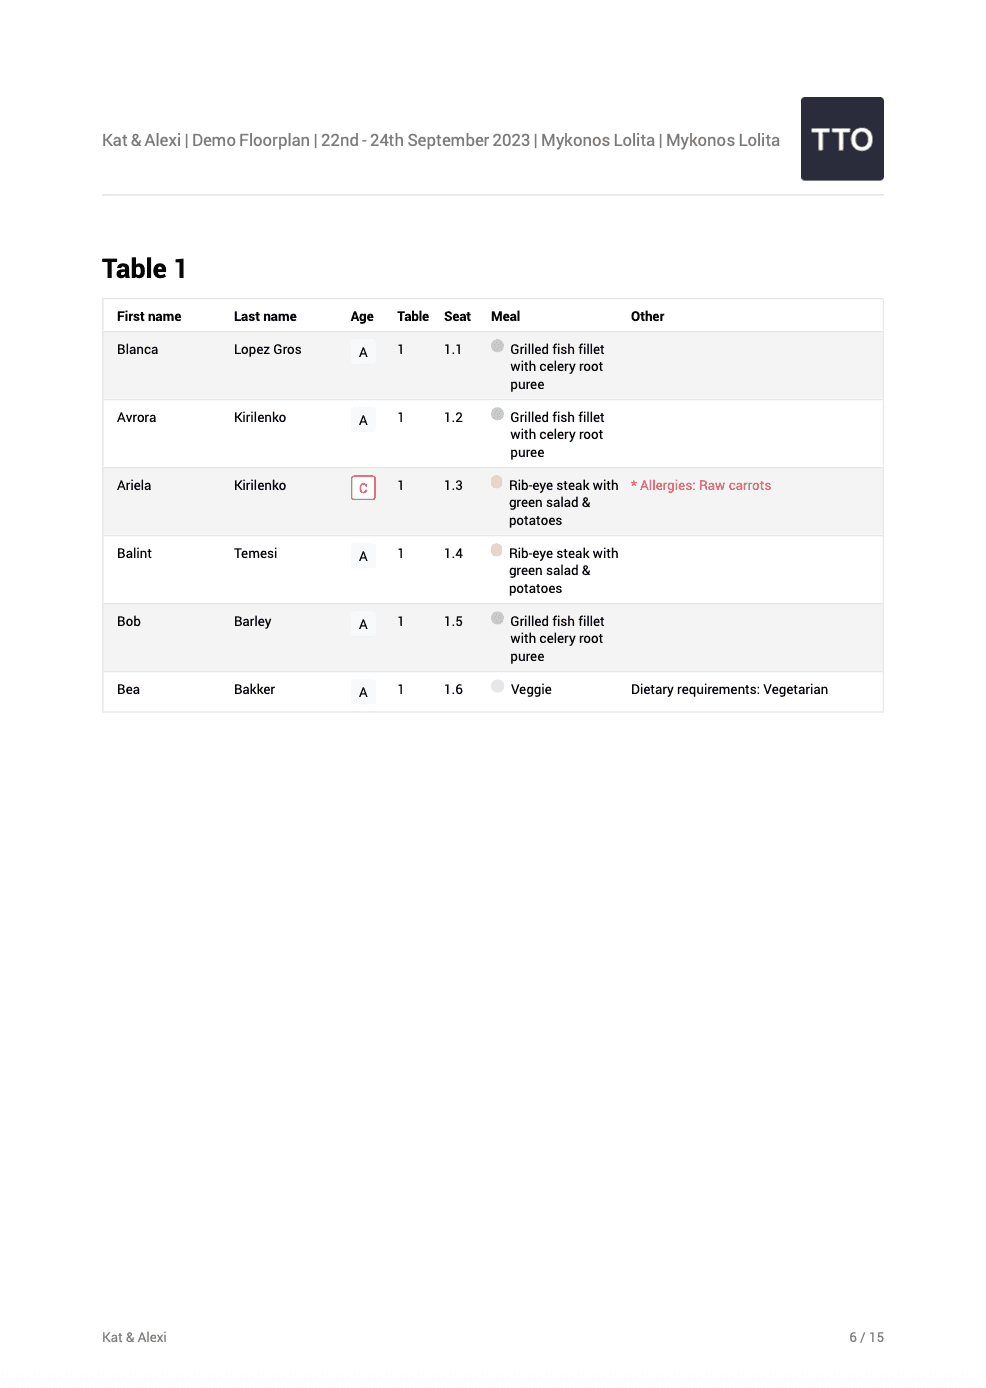
Followed by a table by table view in seat order:
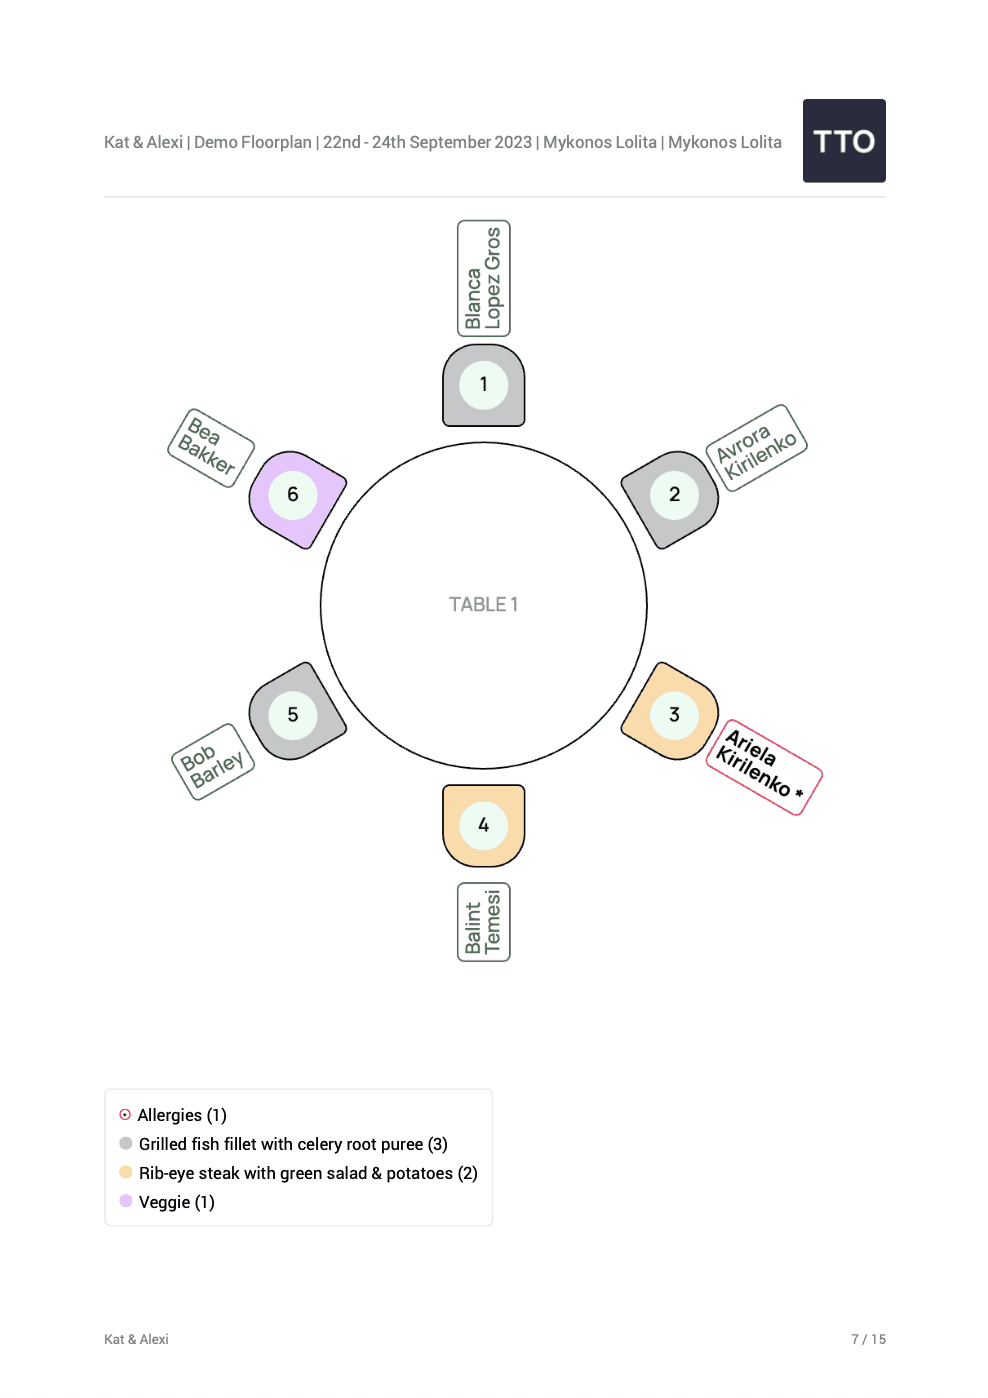
and a zoomed in view of that specific table with a color coded key:
Download a full Example Floorplan & Seating Chart Export here.
FAQs:
1. How is TTO's Floorplan & Seating Chart different to Aisle Planners?
While both platforms offer robust, planner-grade features, That’s The One (TTO) is built from the ground up to simplify every step of your seating and floorplan process—here’s how we compare to common pain points in Aisle Planner:
Intuitive, Wedding-First Interface
TTO: Our drag-and-drop canvas is optimized for weddings, with clearly labeled controls.
Aisle Planner: Users often report a steep learning curve in the layout editor, with key controls feeling non-intuitive or hard to locate. Guests must be added into a list first, before they can be added to a table on the floorplan for example. G2 TrustRadius
Seamless Print & Export
TTO: Generate polished, print-ready PDFs (complete with guest names, table numbers, and meal indicators) in a single click.
Aisle Planner: Planners frequently report having to resort to workarounds (screenshots, PDF hacks, or third-party design apps) to produce a usable hard-copy G2 TrustRadius
Support
TTO: Live chat & quick-start tutorials on YouTube to help planners get up and running in minutes.
Aisle Planner: Many teams find themselves jumping into the online knowledge base just to learn basic floorplan functions, due to sparse in-tool guidance. G2 TrustRadius


